Tankers!!!
Today is time of this beast: A39 Tortoise Super Heavy Assault Gun
 |
| Meng´s box art |
History:
The Super Heavy Assault Gun "Tortoise" (A39) was a British heavy assault tank design developed in World War II but never put into mass production. It was developed for the task of clearing heavily fortified areas and as a result favoured armour protection over mobility. Although heavy, at 78 tons, and not readily transported, it was reliable and a good gun platform.
 |
| Super Heavy Assault Gun "Tortoise" A39 - right side |
 |
| Super Heavy Assault Gun "Tortoise" A39 - left side
|
In the early part of 1943 the Allied forces anticipated considerable resistance in the projected future invasion of Europe, with the enemy fighting from heavily fortified positions such as the Siegfried Line. As a result, a new class of vehicles emerged, in the shape of Assault tanks, which placed maximum armour protection at a higher priority than mobility. Initially, work was concentrated on the
Excelsior tank (A33), based on the Cromwell tank.
 |
| A33 Excelsior Tank |
There was also a program to upgrade the armour of the Churchill tank. For similar work in the Far East, the
Valiant tank (A38), based on theValentine tank was considered although weight was specified to be as low as possible.
 |
| A38 Valiant Tank |
The Secretary of State for War and the Minister of Supply issued a Joint Memorandum in April 1943 which gave a vague specification for an Assault tank, classing it as a special purpose vehicle to operate in heavily defended areas as part of the specialist
79th Armoured Division.
The
Nuffield Organisation responded with 18 separate designs (AT1 through AT18) drafted between May 1943 and February 1944, each design larger and heavier than the last. By February 1944 design AT16 was complete and was approved by the Tank Board who proposed that month that 25 be produced directly from the mockup stage without bothering with a prototype, to be available for operational service in September 1945. An order for 25 was placed by the War Office and work was begun.
Following the end of the war the order was reduced and only 6 vehicles were built. One example was sent to Germany for trials where it was found to be mechanically reliable and a powerful and accurate gun platform, however at a weight of 80 tons and a height of 3.0 m it was extremely slow and proved difficult to transport.
Since the Tortoise had a fixed casemate superstructure instead of a turret, it can be classified as a self-propelled gun or an assault gun and not a tank. The crew included a commander, driver, and gunner, with two loaders for the
32-pounder (93.4mm) gun and two machine gunners. The 32-pdr gun was mounted in a power-assisted limited traverse mounting; rather than being mounted on the more traditional
trunnions, it protruded through a large ball mount in the front of the hull, protected by 225 mm armour. To the left of it was a
Besa machine gun in an armoured ball mount. A further two Besa machine guns were mounted in a turret on the top of the hull to the right.
Internally it was split into three compartments, the transmission to the front, the crew in the centre and the
Rolls-Royce Meteor engine at the rear. The suspension consisted of four bogies on each side each of the hull. Each bogie had two pairs of wheels, with each pair linked to a transverse torsion bar. The Merritt-Brown transmission was fitted with an all speed reverse, giving approximately the same speed backwards as forwards.
 |
Two Diamonds T M19 heavy tractors with
Crane 70 ton trailer carry an A39 Tortoise. |
Once the War had ended the order was reduced and ultimately only 6 vehicles were ever built. The Tortoise P5 "ADVENTURER" was sent to Germany for automotive and gunnery trials where it was found to be reliable and a hard hitting and accurate gun platform, however at 80 tons it proved to be difficult to transport and at a height of 10 feet was considered too tall. On completion of the trials the Tortoise was discarded.
font:
Specs:
 |
| George Bradford drawing |
| Specifications |
|---|
| Weight | 78 long tons |
|---|
| Length | 10 m (33 ft) |
|---|
| Width | 3.9 m (13 ft) |
|---|
| Height | 3 m (9 ft 10 in) |
|---|
| Crew | 7 (Commander, gunner, machine gunner, 2 loaders, driver, co-driver) |
|---|
|
| Armour | 178–228 mm (7–9 in)
33 mm (1.3 in) top |
|---|
Main
armament | Ordnance QF 32 pounder
(94 mm gun) |
|---|
Secondary
armament | 3 x 7.92 mm Besa machine guns |
|---|
| Engine | Rolls-Royce Meteor V12 petrol
600 hp (450 kW) |
|---|
| Power/weight | 7.7 hp/tonne |
|---|
| Suspension | torsion bar |
|---|
Operational
range | Road: 140 km (87 mi) |
|---|
| Speed | Road: 19 km/h (12 mph)
Off-road: 6 km/h (4 mph) |
|---|
A historical possibility (hypothetical) of marking:
 |
A39 Tortoise ADVENTURER
Based on a George Bradford drawing |
The kit:
Opening the box:
 |
| Tortoise kit box, booklet and parts in my workbench |
 |
| The booklet instructions |
The Tortoise is huge. Compare the size of this beast with a Shermie M4 and Panzer IV Ausf F.
 |
| Size is worthwhile ... |
 |
| Side by side with Jagdtiger. Tortoise is huge !!! |
I started the building by the book: ie, the suspension ... The rear wheels are at different distances. So, you have to cut one of the pieces A9
 |
| Notice the A9 part cropped (center below) |
The rears wheels and suspension arms: Notice the different sizes.
 |
| The rear wheels : the short (left side) and the long (right side) |
 |
| The rear wheels in the hull |
It is very important to observe the perpendicularity of the arms of the wheels in relation to the hull.
 |
| Perpendicularity is very, very important !!!! |
After building the rear bogies, I started building the other bogies. But, according to the instructions, the building of bogies is a real nuts. The parts are very difficult to build ... Not because of defective parts, but because of the sequence of the inserts. By the booklet, assembly is a real nightmare!!!
Then, I remembered seeing a Tortoise in building in this site:
Modelers Social Club Forum. In this (excelent) forum,
Mike Shackleton proposes a new approach in the building of the bogies:
"1 - Do not clip link arm A3 into axle arm A10.
2 - Glue A10 in between the road wheels.
3 - Suspension arms and the pivot bar can be added as per instructions. Make sure these are all square and allow the glue to set.Do notglue the arms to the wheels. They will need to move later on."
I followed the "Shackleton Method" and really build the bogies, although delicate, is not maddening. Mike hit bull's eye!!
Thanks a lot, Mike !!!!
 |
| Pasting the A2 parts in the A5 part |
 |
| The bogies built by "Shackleton Method". In the top, the booklet method: pfuh !!! |
 |
| Brackets suspensions with parts A3 parts ("Shackleton Method") |
 |
| The bogie almost ready... |
 |
| And all the bogies built by Shackleton Method. Piece of cake !!! |
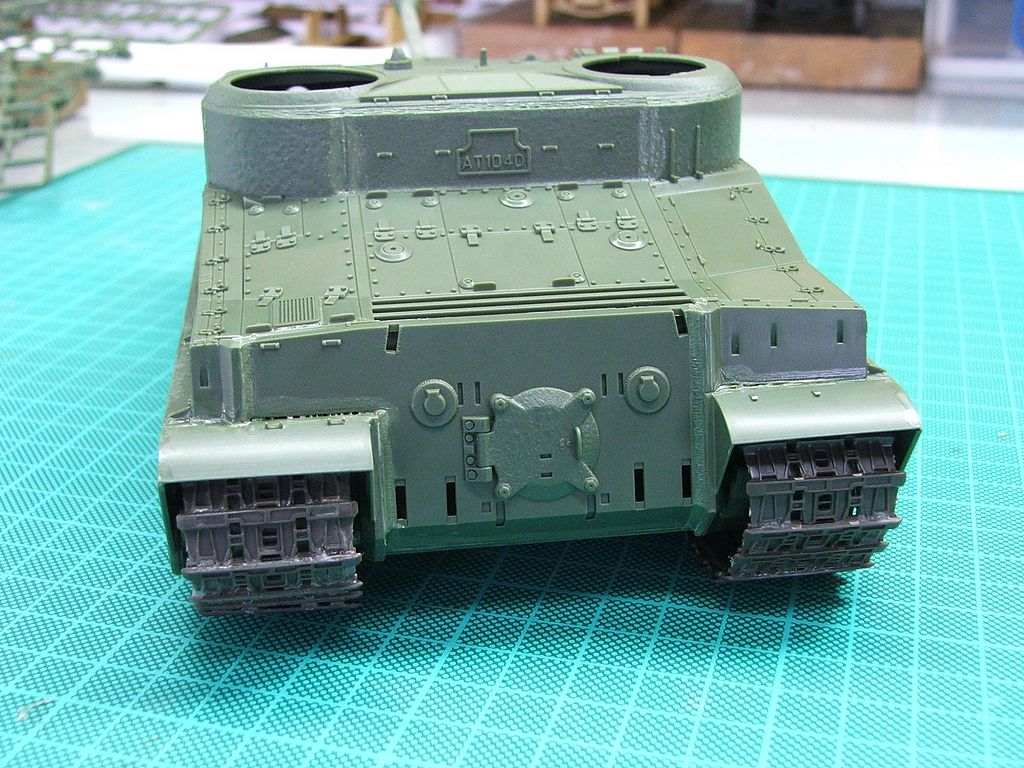
After that, I built the front glacis...
... and started the superstructure ...
 |
| Notice the gun... |
 |
| Rear view. |
To close the armour sides, I built the tracks; Link by link...Very good and smooth to build.
 |
| The armored side skirts... |
 |
| Building the tracks... |
 |
| ...with "welder" glue. |
Here, I had a doubt: In the pictures of the kit and the Museum, the tracks are in a position, but in the photos from 1945, the links of the tracks appear inverted. What positioning using??
 |
| Notice the 1945 and the Museum pics... |
I opted for the position of the real photos, from the vehicle of 1945 (the opposite the kit ...)
 |
| Tracks: rear view. |
The build continues... I do all the work today. The kit is very easy to build. ( after Mike´s shortcut, of course !!!)
 |
| Using a metal stuff (RBModels Besa MG) |
 |
| Very good !!! |
... and the Girl looks like this, right now:
 |
| Almost there... |
A lttle advance, after the day in my Clinic:
 |
| Turret with machine guns in progress...Notice the little triangle scrapped from front glacis... |
About the casting Red Triangle, in the Tortoise´s front glacis, I scrapped off. It´s represents the vehicle is a test vehicle, made with normal and mild steel and his hull is unarmoured (no tempered steel).
My girl will be operational !!!
Well, some progress in my huge British girl. After scrap the casting triangle, I started building the crew hatches. As I don´t know when or how I will assemble the figures for this beast, I decided to make the hatches hinged. I used a Dremmel to drill the hinges and allow movement of the hatches ...
 |
| Drilling the hinges of the turret hatch |
 |
| low rotation and steady hand... |
 |
| drilling the hinge device in the turret... |
 |
| using copper wire as pin for the hinge movements... |
 |
| The hatches open.... |
 |
| closing...closing... |
 |
| Closed! |
Notice the MG Besas replaced by metal stuff from RBModels:
 |
| The kit and metal Besas... |
 |
| I cut the plastic MG bases, for adapt the metal guns. |
I decided to make my tank as a late prototype (the P3, P4 or P5). But Meng´s kit represents only the initial versions (P1 and P2) of this monster.
The main difference is the presence of a hatch for loading ammunition in the upper left side, on the vehicle superstructure.
 |
| Different types of A39 |
The biggest problem was to find a picture that represents the hinge mechanism of the hatch of ammo. The research material of the Tortoise is rare, even more of the final versions of the vehicle. Who saved the day was Saul Garcia, who sent me this photo:
 |
| A39 Tortoise with ammo loading hatch - rear view |
With it, I could build the ammo hatch with plasticard. There this:
 |
| I did the ammo hatch with plasticard 2mm thick, compass, scalpel, ruler, some tools and tons of fun ... |
 |
| In close-up |
 |
| A39 Tortoise late version, ready for primmer. |
After that, I applied primmer in my model:
 |
| Tortoise with primmer |
And fix a flaw of Meng´s kit: the absence of casting marks on the gun mantlet and machine gun Besa shield. For this, I used the excellent raised decal of Archer. I like to use the decal AFTER the primmer, to increase the detail of the decal
 |
| The abscence of mantlet´s casting marks |
 |
| Archer decal - wonderful !!! |
 |
| Another view of casting marks. |
Then, I painted the tank:
 |
| The girl in green... |
After the paint has dried, I applied with airbrush a thin layer of Future, to prepare the tank for the markings and weathering:
 |
| Future (or Pledge) in the tank |
 |
| She´s shinning !!! |
I'm thinking of using these markings:
 |
A39 Tortoise - 79th Armoured Division
Based on a George Bradford drawing
|
The stars and red triangle are from my spare box; The bull head (79 AD) and serial numbers from Archer, the AoS 991 and bridge tonnage I made with my Laserjet Color. All decals were applied with Future:
 |
| A39 Tortoise in colors... |
 |
| A39 Tortoise - markings - front view |
 |
| left side |
 |
| rear view |
 |
| right side |
 |
| bird view |
 |
| right view - close up |
 |
| Front view - close up - notice the casting marks in the gun´s mantlet |
The weathering stages of Tortoise. I will not do a heavy weathering ...
 |
| Washes and filters |
 |
| Tortoise left side |
 |
| Tortoise right side |
And almost there...
 |
| Tortoise almost ready - Notice the aerials, made with acupuncture needles |
 |
| The jerrycan (Italeri) built, but unpainted... |
 |
| The Girl is huge, indeed !!! |
 |
| A39 Tortoise heating the engine... |
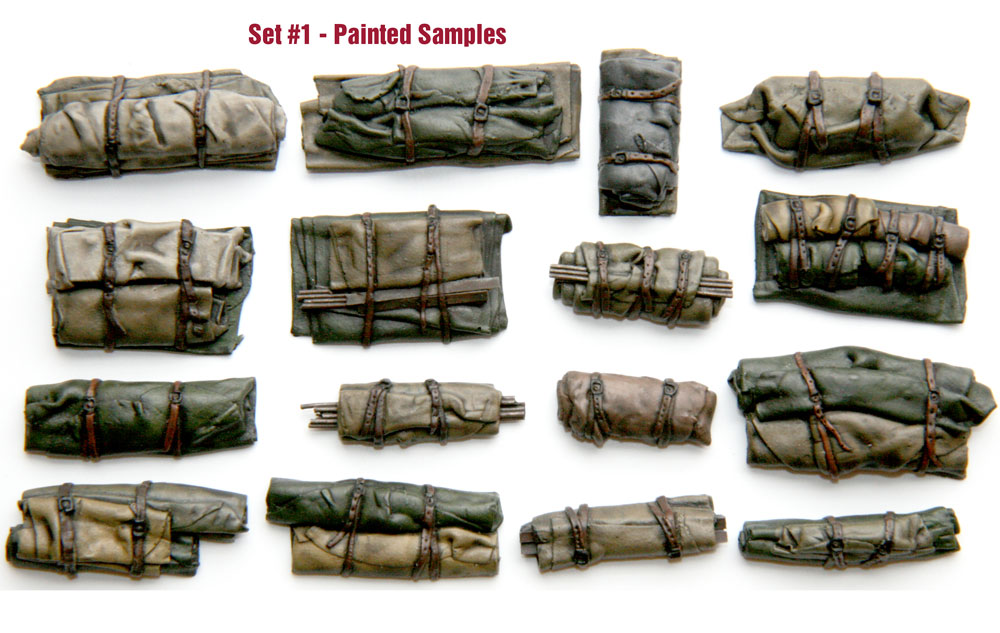
Since I decided to make my Tortoise "operational", I decided to put some stuff of the crew on the monster´s hull. A great opportunity to use the stowage sets from
Value Gear:
Tankers ....
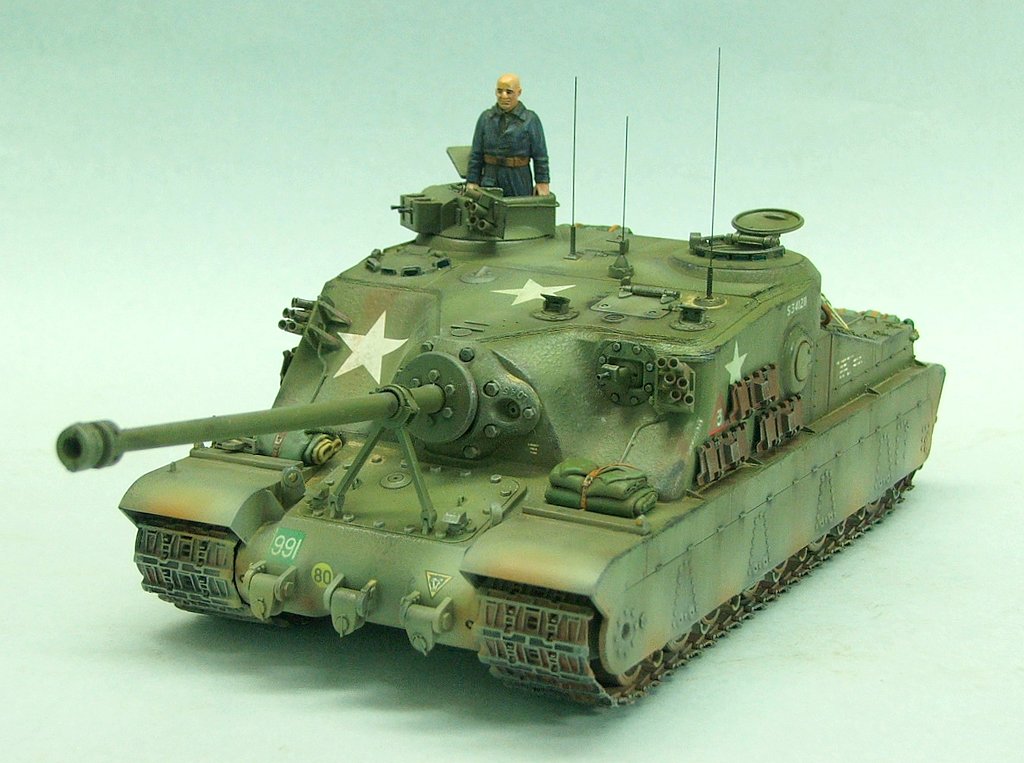
Finally, I finished the beast! The kit is simply a delight to build. As was said earlier, the destroyer was made with markings of a possible operational life in the hands of Hobart's Funnies. Here are the photos:
 |
| A39 Tortoise from 79th British Armored Division - Hobart´s Funnies |
 |
| A39 Tortoise - left side |
 |
| A39 Tortoise - left rear |
 |
| A39 Tortoise - right rear |
 |
| A39 Tortoise - right side |
 |
| A39 Tortoise - front view |
 |
| A39 Tortoise |
 |
| A39 Tortoise with Kojak, for size comparison |
 |
| Kojak pleased as Commander of the Tortoise |
For final, a size comparison between two monsters: Jagdtiger henschel and tortoise, side by side... Huge, very huge girls...
 |
| Jagdtiger and Tortoise |
Thanks, guys, for your company on this project ...
See you soon!